
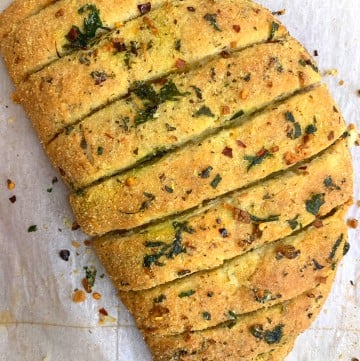
This homemade Stuffed Cheesy Garlic Bread recipe is a copycat version of Dominos Stuffed Garlic bread, which is a creamy, cheesy garlic flavored bread recipe.
When we lived in Bangalore, Dominos Pizza was our favorite go-to place for Pizzas. My husband and I almost went there every week. Our favorite dishes were stuffed garlic bread, pizzas, and choco lava cake.
After I moved to the USA, we looked for similar stuffed garlic bread on the Domino menu. But, unfortunately, we could not find it on their menu.
So I decided to make this dish at my home. I found this recipe from the BharatzKitchen blog. So, one day, I surprised my husband by making this dish, and I still remember the joy on his face. You may also like my veg chili cheese toast.
This dish is also very memorable because I started my blogging career with this recipe. I shot my first YouTube cooking video with this recipe.
I have shown how to make Dominos-style stuffed cheesy garlic bread in this recipe. If you want to make only the garlic breadsticks available in Dominos, follow the same process, but skip adding mayonnaise and sweet corn.
Jump to:
How to Make Dominos Style Stuffed Cheesy Garlic Bread
For the Garlic Bread Dough Recipe
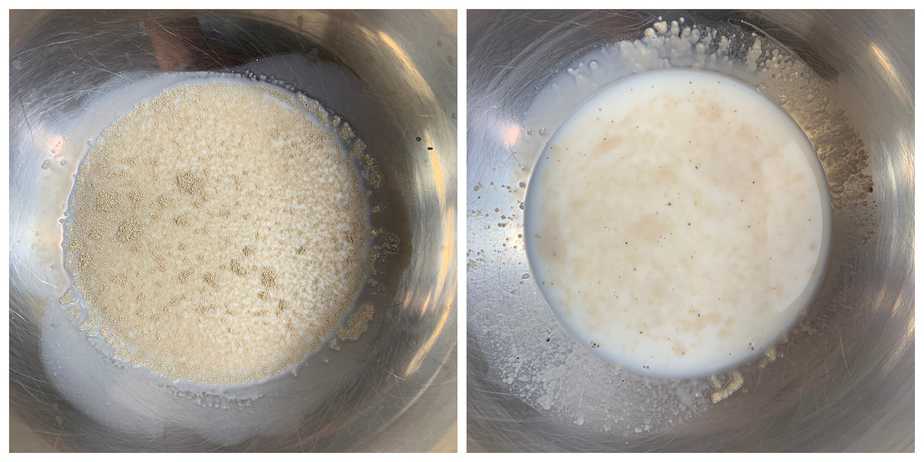
Firstly, take (¼ cup +1 tablespoon) warm milk, 1 teaspoon sugar, and 1 teaspoon active dry yeast (I used Rapidrise yeast brand) in a large mixing bowl. Mix well.
Rest for 10 minutes in a warm place (I generally like to keep it in the microwave or the oven). After 10 minutes, yeast is activated. (*You will start seeing tiny bubbles)
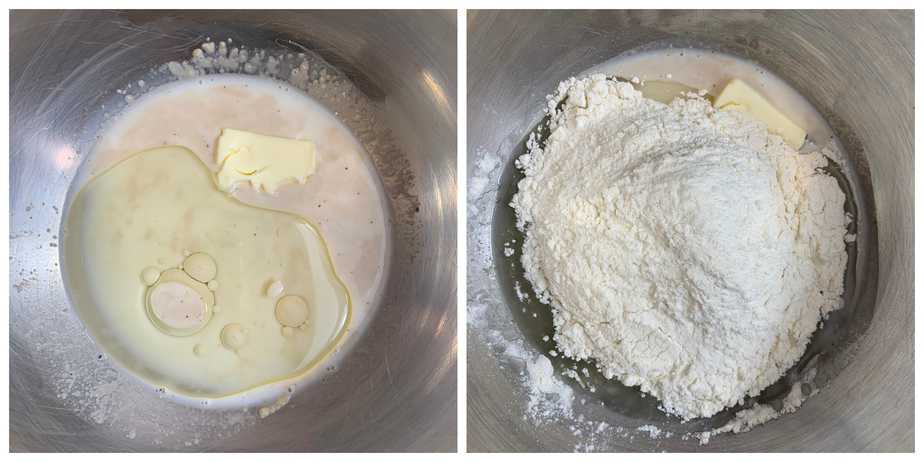
Furthermore, add 1 tablespoon oil, ½ tablespoon room temperature butter (optional), 1 cup maida (all-purpose flour), and salt to taste. Butter is optional here.
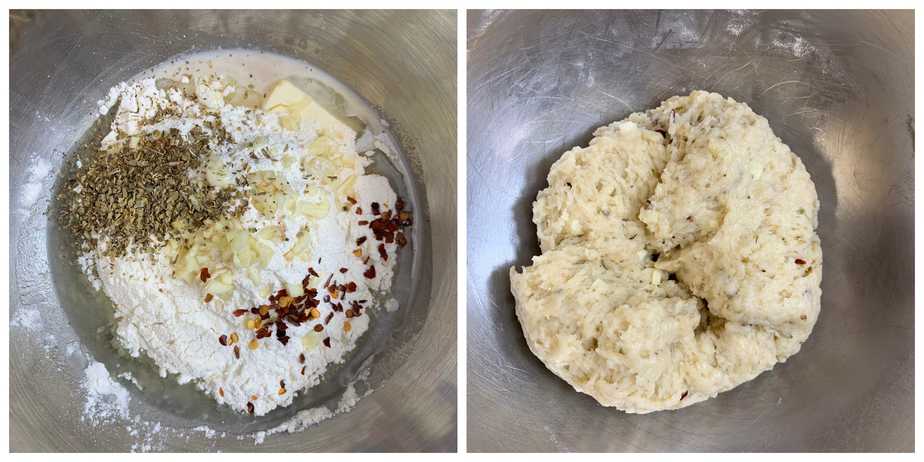
Then, add 4 minced garlic cloves, ¾ teaspoon dried oregano, and ½ teaspoon red chili flakes. Knead the dough well for at least 10 minutes (to activate gluten). You can add 1-2 tablespoons of extra water if the dough is too tight.
Make the dough smooth and stretchy; otherwise, garlic bread will turn hard and chewy.
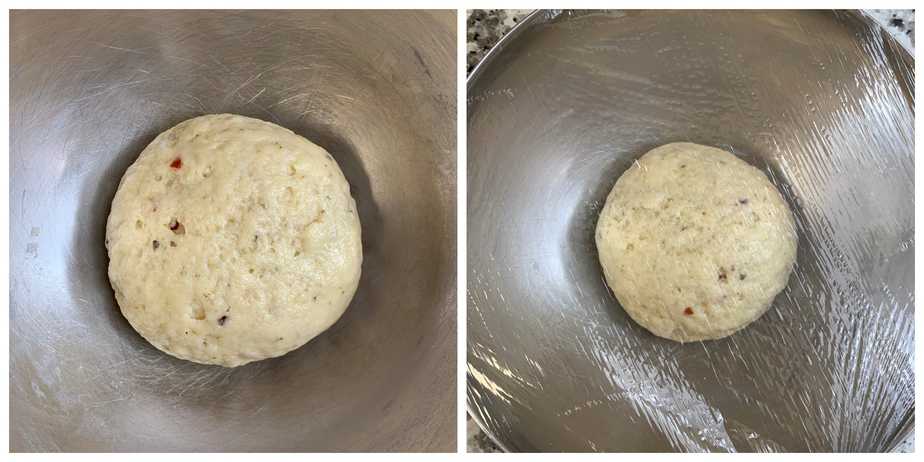
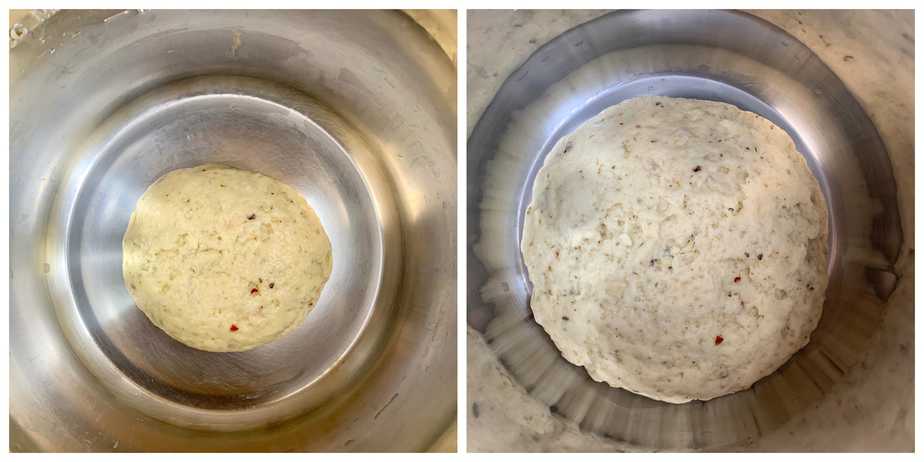
Allow the dough for proofing. Lightly smear some oil on the dough. Cover it with a tea towel or cling wrap and let it proof for 2 hours in a warm place.
OR
You can use an Instant Pot to proof the dough. Smear the inner pot with some oil and place the dough. Close the lid, select the 'YOGURT' button, set the pressure value to 'Sealing,' and set the timer to 1 hour.
After 1 hour, the dough should have doubled in size, then punch the dough.
For the Garlic Butter Recipe
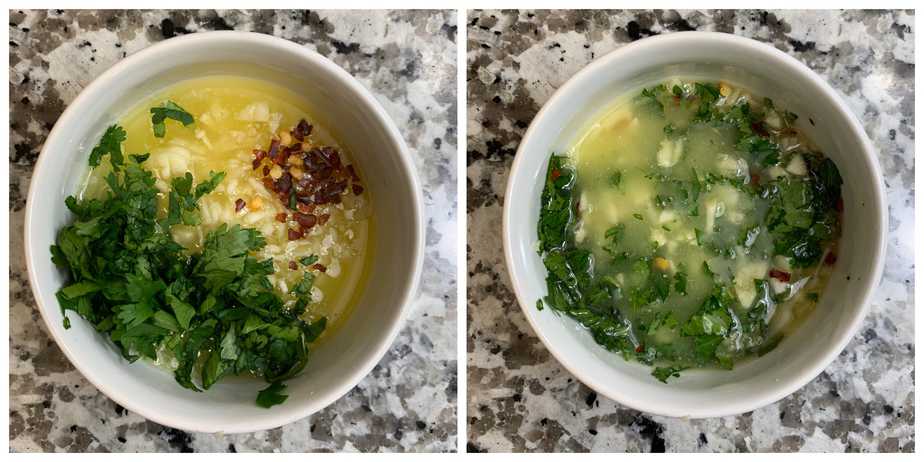
Mix in 2 tablespoons of melted butter, 3 garlic cloves (minced), and 1 tablespoon coriander leaves (or parsley) in a small bowl. Keep it aside.
For the Stuffed Garlic Bread Recipe
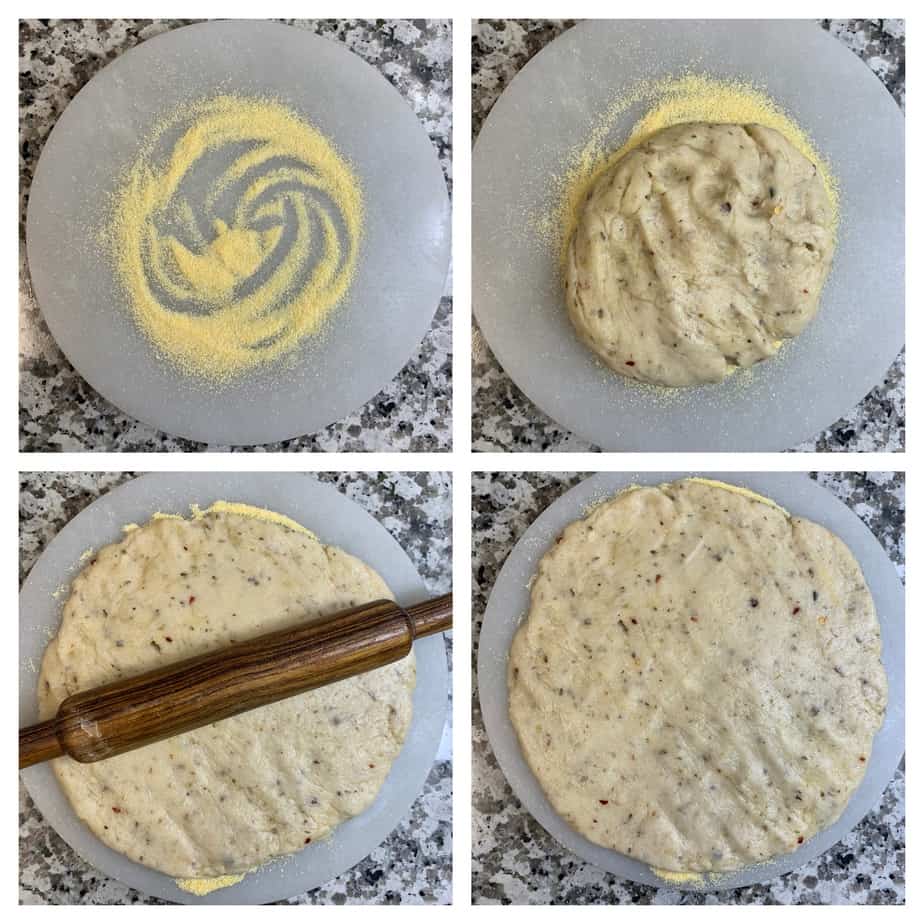
Sprinkle some cornmeal (also known as "makki ka atta" in Hindi) on a flat surface to give the dough a crunchy outer coating. Then, roll the dough into a circle.
Note: Cornmeal is optional, but this is a secret ingredient used in Dominos to make garlic bread crust crispy.
Meanwhile, line a baking tray with parchment paper or grease it with butter. Place the rolled dough circle onto the tray and generously spread the garlic butter over it.
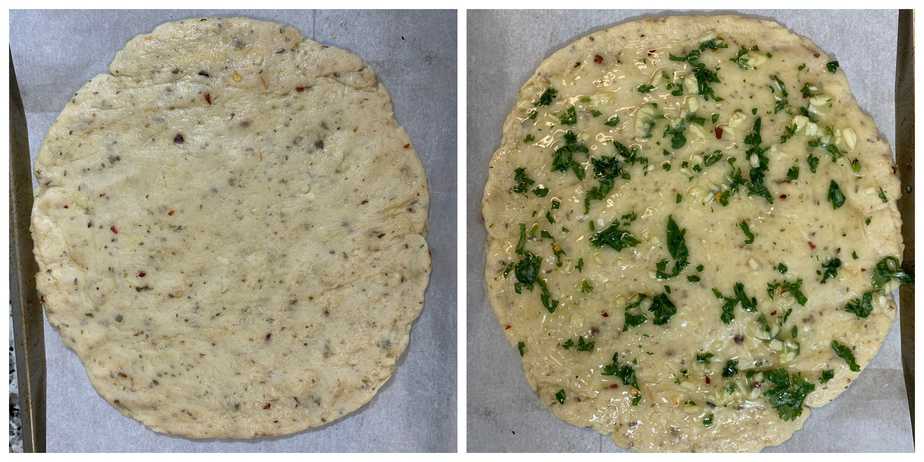
Further spread some mayonnaise (2 tablespoons), top with ¼ cup boiled sweet corn and ½ cup mozzarella cheese on one half of the circle.
Also, season with red chili flakes and oregano seasoning on top.

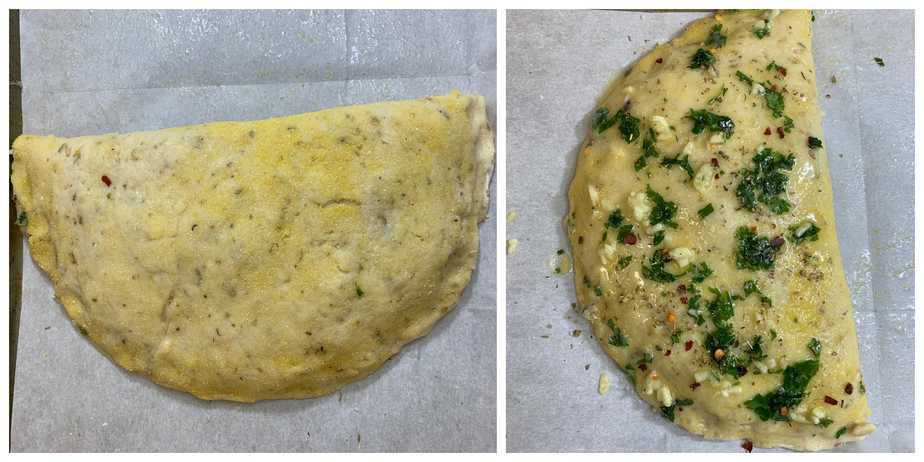
Fold the dough into a semicircle and seal the edges properly else, the cheese will come out.
Then, brush a generous amount of prepared garlic butter on top, along with some chili flakes and dominos style oregano seasoning.
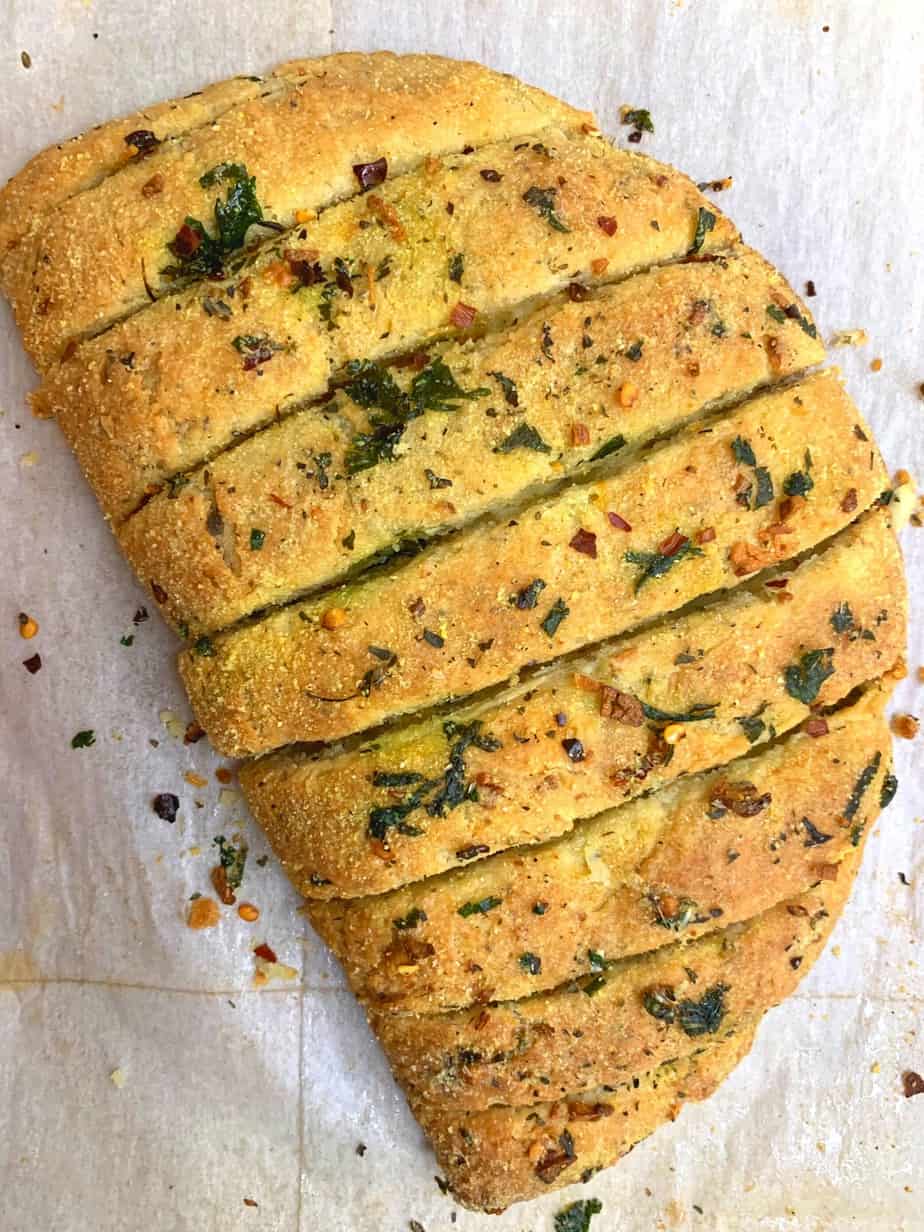
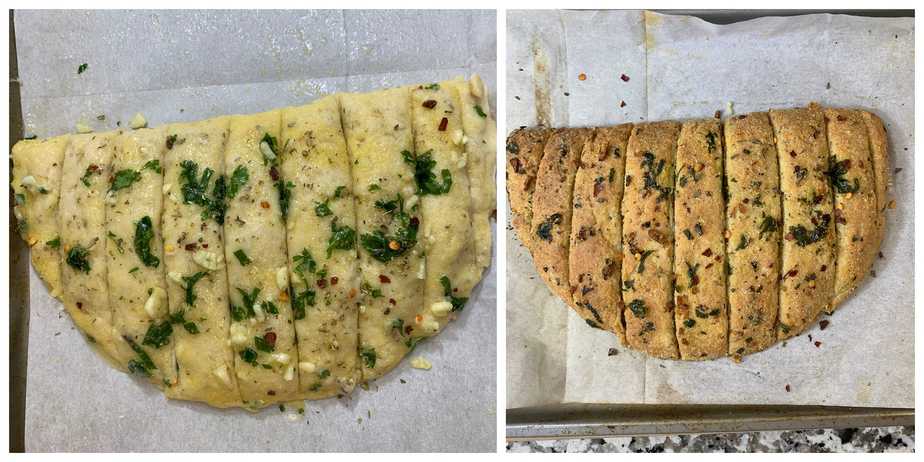
Mark the garlic bread into breadsticks without cutting them entirely.
Bake in preheated oven at 180 degrees Celsius (365 °F) for 20-25 minutes or until you have a nice golden brown color.
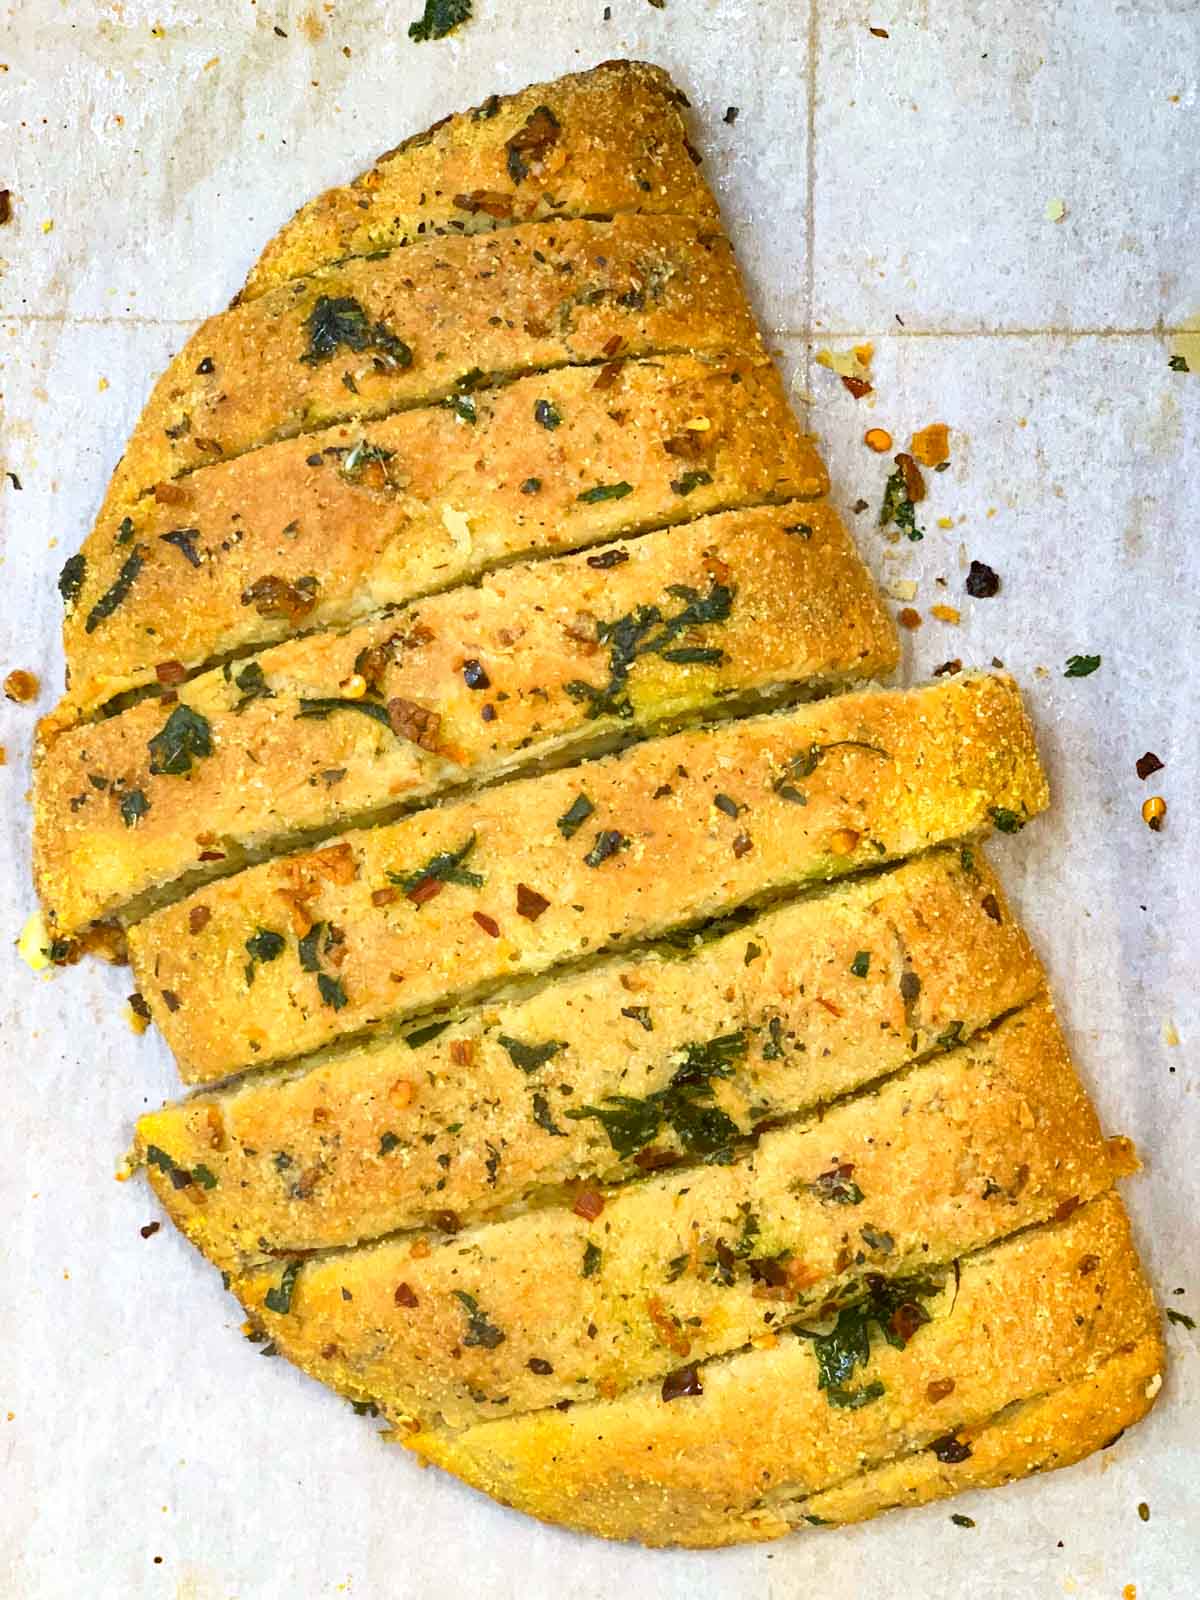
Cut the stuffed garlic bread into breadsticks when hot.
Serve hot with mayonnaise, or cream cheese, or garlic dipping.
Serving Suggestions
Serve Stuffed Garlic Bread with ketchup, mayonnaise, cream cheese, or sriracha mayo. Any soft drink or soda goes well with this.
Variations
- I have used only mozzarella cheese here, but you can use a blend of both mozzarella and cheddar cheese.
- You can use either active dry yeast or instant yeast. Instant yeast takes less time for proofing.
Tips to Make Best Stuffed Cheesy Garlic Bread
- Do not forget to add sugar to the yeast and warm milk mixture. Sugar acts as a catalyst that kicks start the yeast fermentation process.
- You can also use warm water instead of warm milk. Milk should be just lukewarm. If it's too hot, it will kill the yeast. If it's too cold, it will not activate the yeast in the first place.
- Cornmeal is optional, but this is a secret ingredient used in Dominos to make garlic bread crust crispy.
- Proofing time (raising the dough) in a normal bowl at the countertop takes 2 hours. In an Instant Pot, it takes 1 hour.
- Always preheat the oven for 10 min before baking.
More Indian Appetizer Recipes


Dominos Style Stuffed Cheesy Garlic Bread
Ingredients
For Stuffed Garlic Bread Dough:
- ¼ cup +1 tablespoon warm milk (or warm water)
- 1 teaspoon active dry yeast (rapidrise yeast)
- 1 teaspoon sugar
- salt to taste
- 4 garlic cloves minced
- ¾ teaspoon dried oregano
- ½ tablespoon unsalted butter at room temperature (optional)
- 1 cup plain flour / maida / all purpose flour
- 1 tablespoon oil
For Garlic Butter:
- 2 tablespoons butter melted
- 3 cloves garlic minced
- 1 tablespoon coriander leaves (or parsley), chopped
Other Ingredients:
- 2 tablespoons corn meal to dust, (optional)
- 2 tablespoons mayonnaise (i used eggless)
- ¼ cup boiled sweet corn
- ½ cup mozzarella cheese (or any cheese of choice)
- 1 teaspoon red chilli flakes divided
- 1 teaspoon oregano seasoning divided
Instructions
For Garlic Dough Recipe:
- Firstly, take warm milk, sugar, and active dry yeast in a large mixing bowl. Mix well.Rest for 10 minutes in a warm place. After 10 minutes, yeast is activated. (*You will start seeing tiny bubbles)
- Furthermore, add oil, butter, maida (all-purpose flour), and salt. Butter is optional here.
- Then add minced garlic, oregano, and red chili flakes. Knead the dough well for at least 10 minutes (to activate gluten). You can add 1-2 tablespoons of extra water if the dough is too tight. Make the dough smooth and stretchy; otherwise garlic bread will turn hard and chewy.
- Allow the dough for proofing. Lightly smear some oil on the dough. Cover it with a tea towel or cling wrap and let it proof for 2 hours in a warm place.ORYou can use an Instant Pot to proof the dough. Smear the inner pot with some oil and place the dough. Close the lid, select the 'YOGURT' button, set the pressure value to 'Sealing,' and set the timer to 1 hour.After 1 hour, the dough should have doubled in size, then punch the dough.
For Garlic Butter Recipe:
- Mix in melted butter, minced garlic, and parsley or coriander leaves in a small bowl. Keep it aside.
For Stuffed Garlic Bread Recipe:
- Sprinkle some cornmeal (also known as "makki ka atta" in Hindi) on a flat surface to give the dough a crunchy outer coating. Then, roll the dough into a circleNote: Cornmeal is optional, but this is a secret ingredient used in Dominos to make garlic bread crust crispy.
- Meanwhile, line a baking tray with parchment paper or grease it with butter. Place the rolled dough circle onto the tray and generously spread the garlic butter over it.
- Further spread some mayonnaise, top with boiled sweet corn and mozzarella cheese on one half of the circle.Also, season with chili flakes and oregano on top.
- Fold the dough into a semicircle and seal the edges properly else the cheese will come out.
- Then brush a generous amount of prepared garlic butter on top along with some chili flakes and oregano seasoning.
- Mark the garlic bread into breadsticks without cutting them entirely.
- Bake in preheated oven at 180 degrees celsius (365 °F) for 20-25 minutes or until you have a nice golden brown color.
- Cut the stuffed garlic bread into breadsticks when hot.Serve hot with mayonnaise or cream cheese, or garlic dipping.
Notes
Tips & Variations
- Do not forget to add sugar to the yeast and warm milk mixture. Sugar acts as a catalyst that kicks start the yeast fermentation process.
- You can also use warm water instead of warm milk. Milk should be just lukewarm. If it's too hot it will kill the yeast. If it's too cold it will not activate the yeast in the first place.
- Cornmeal is optional, but this is a secret ingredient used in Dominos to make garlic bread crust crispy.
- Proofing time (raising the dough) in a normal bowl at the countertop takes 2 hours. In an Instant Pot, it takes 1 hour.
- Always preheat the oven for 10 min before baking.
- I have used only mozzarella cheese here but you can use a blend of both Mozzarella and Cheddar Cheeses.
- You can use either active dry yeast or instant yeast. Instant yeast takes less time for proofing.
Nutrition
★ Like this recipe? FOLLOW ME on Facebook, Instagram, Pinterest, and Youtube for more quick & easy recipes.

Divya
Came out delicious...after stuffing the bread I let it sit for another 15 mins before baking ...It was fluffy and was better than dominos 😋
Thanks for the recipe
Bhavana Patil
Hey Divya... So good to hear that, glad you liked it.
Mona
Hi the recipe is good but mine bread doesn’t came out brown from upside but it’s crispy from the bottom
M.
Just tried this recipe and happily reaping the delicious consequences. Thank you for sharing it!
Bhavana Patil
Happy to know.. thank you for sharing your feedback 🙂
Roopa
Tried this today and turned out super. Thanks for a perfect recipe
Bhavana Patil
I am so glad to hear that Roopa, Thank you for sharing your feedback.
Roopa
Can i use mixed herbs in palce of oregano since i don't have it? Doing this tomorrow.
Bhavana Patil
Yes, you can. Let me know how it turns out.