
Learn how to make a homemade ghee recipe with grass-fed unsalted butter using the Instant Pot and stovetop pot with tips, and tricks.
Ghee has long been a staple in Indian Cuisine. And, in recent years, ghee has become quite popular globally, trending as a "superfood". It is widely used in cooking Indian rice dishes like veg biryani, vegetable pulao, sweets like halwa, rice kheer, snacks, and spread on roti, or naan.
Till date, My Mom makes ghee the traditional way from scratch. First, by boiling milk, separate the fresh cream (malai), by churning cream until the fats separate from the liquid (buttermilk), and then cook the butter to make ghee. She also adds some smashed garlic cloves or fresh curry leaves at the end for added flavor.
Making ghee at home may seem difficult at first, but trust me, once you make it at home, you will never buy the store-bought ones.
I have shared few tips and tricks on how to make a ghee recipe with unsalted butter at home using the Instant Pot and stovetop. This recipe was created using a 6qt Instant Pot DUO60 Multi-use Pressure Cooker.
Jump to:
What is Ghee?
Ghee, also known as "liquid gold," is a type of clarified butter, where butter is simmered until the water evaporates, and the milk solids settle at the bottom, turning golden brown. It is then strained away to leave just pure golden yellow liquid called Ghee, which has a sweet aroma and nutty flavor.
It is also known as Desi ghee in Hindi, Tuppa in Kannada, Neyi in Tamil, Neyyuh in Malayalam, Thup (Sajuk Tup) in Marathi.
Ghee originated in India and has been widely used in Indian cuisine and Ayurvedic medicine since ancient times. Ghee is used to make snacks, curries, sweets, rice, and other dishes in India. It enhances the flavor of the dishes it is added to.
If you don't wish to make your own ghee, you can easily buy Ghee in Indian or South Asian stores or on Amazon.
Is Ghee the same as Clarified Butter?
No, they are slightly different. For clarified butter, you boil the whole butter until milk solids and water are separated. Ghee is a form of clarified butter you cook further to remove all the moisture and let the milk solids brown (caramelize). Then, you strain them out to leave pure nutty-flavored ghee.
Ingredients
You just need only one ingredient, "Butter," to make the homemade ghee.
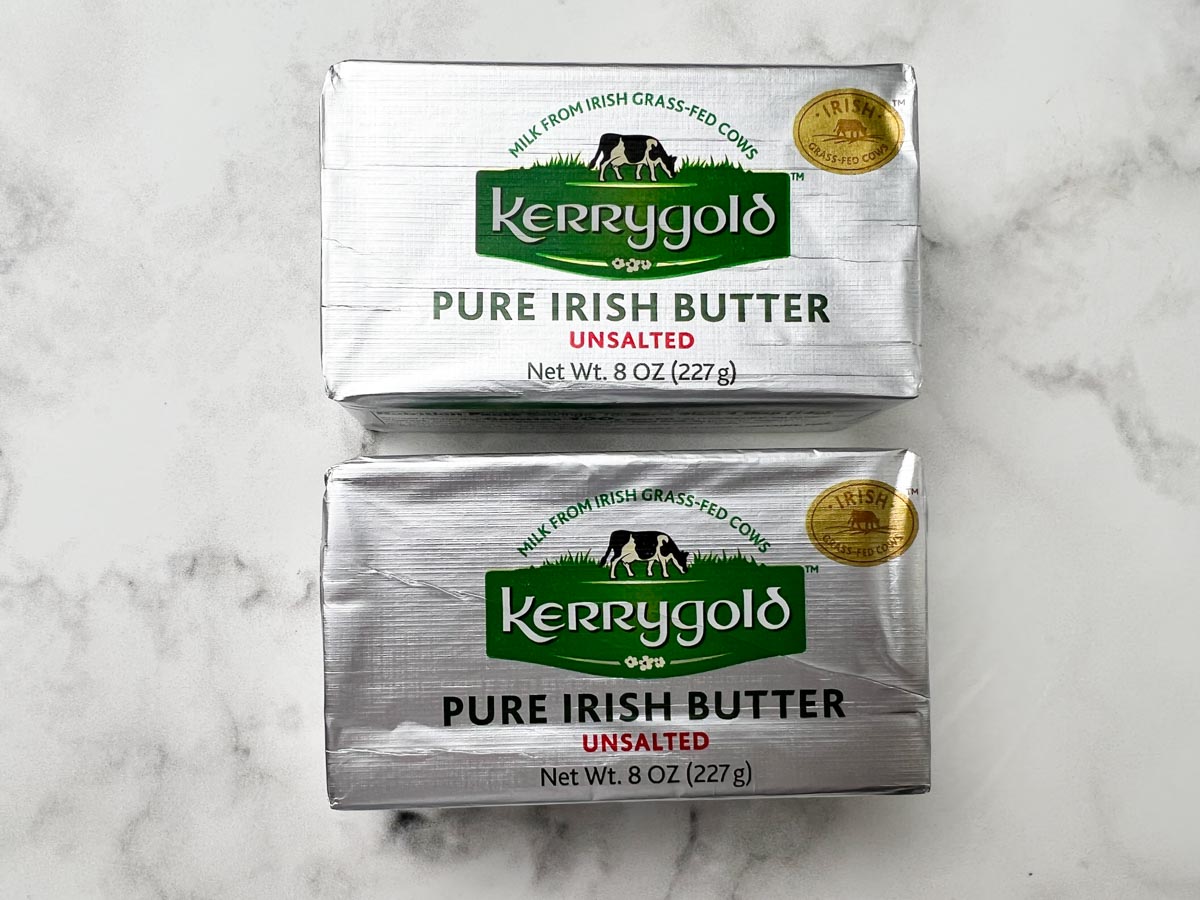
Always use high-quality butter. I prefer Kerry Gold unsalted butter to make ghee as it is made from grass-fed cows. It gives the best color, taste, and grainy texture, which is very close to our Desi Ghee back in India. This is widely available in Costco, Whole Foods, Trader Joe's, Target, and most other grocery stores. Kirkland (Costco) unsalted butter also works very well.
You can also make ghee with salted butter, just keep in mind salted butter cooks much faster than unsalted butter.
How to Make Homemade Ghee from Butter in Instant Pot
Below are the steps for making ghee in Instant Pot using 1 pound (16 ounces) of unsalted butter. Cooking time can vary depending on the type, quality, and temperature of the butter.
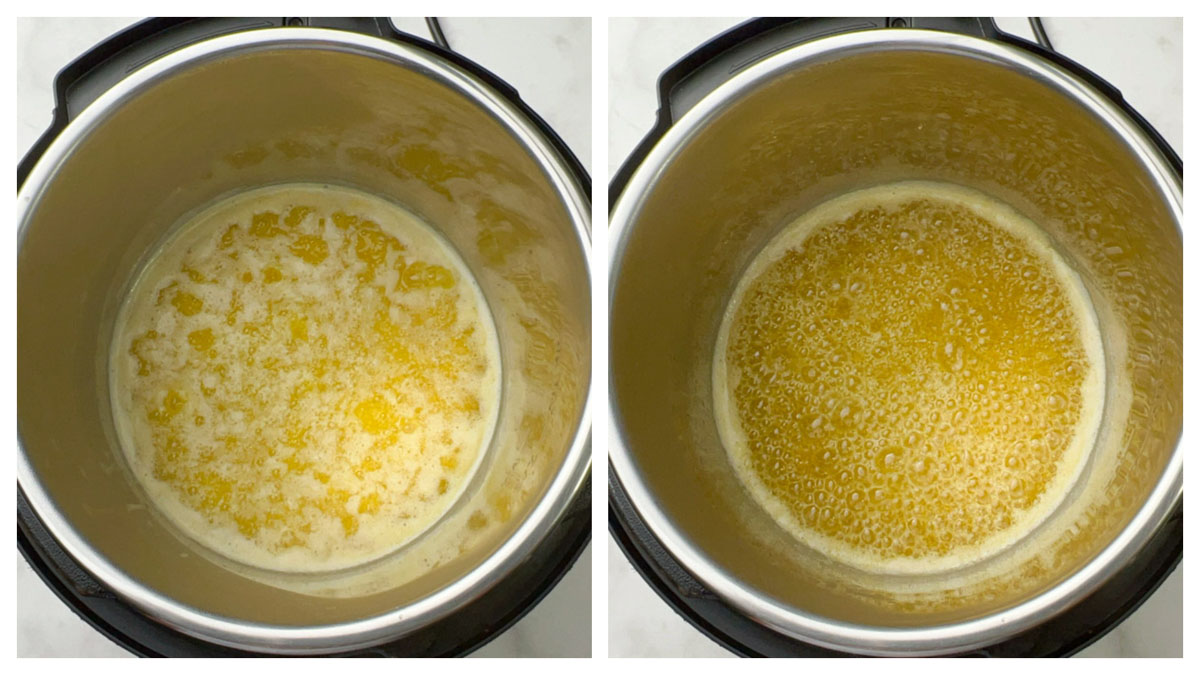
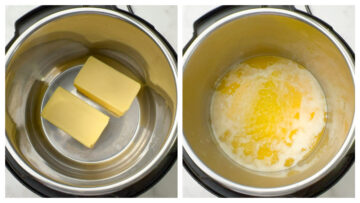
Step 1: Melt the Butter.
Unwrap the refrigerated unsalted butter. Place it in the Instant Pot steel insert and turn on the Saute (Normal) mode. The butter will start to melt.
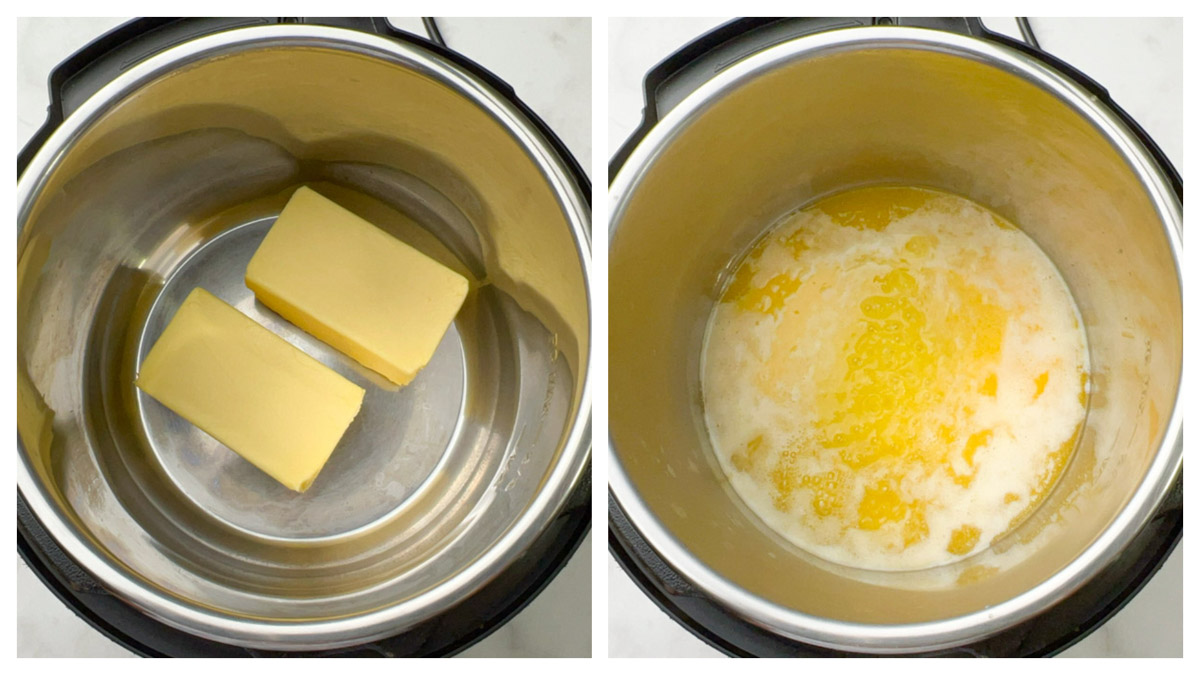
Step 2: Simmer Until Milk Solids Separate.
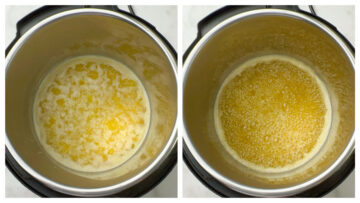
After a few minutes, the melted butter will form a white foam, float on top, and bubble. It will sputter a bit as the water starts to evaporate.
After a couple of minutes, the white foam will begin to clear, and the surface will be filled with tiny clear bubbles. The ghee color will gradually change from buttery pale yellow to light golden. The milk solids (milk protein) will begin to separate and sink to the bottom.
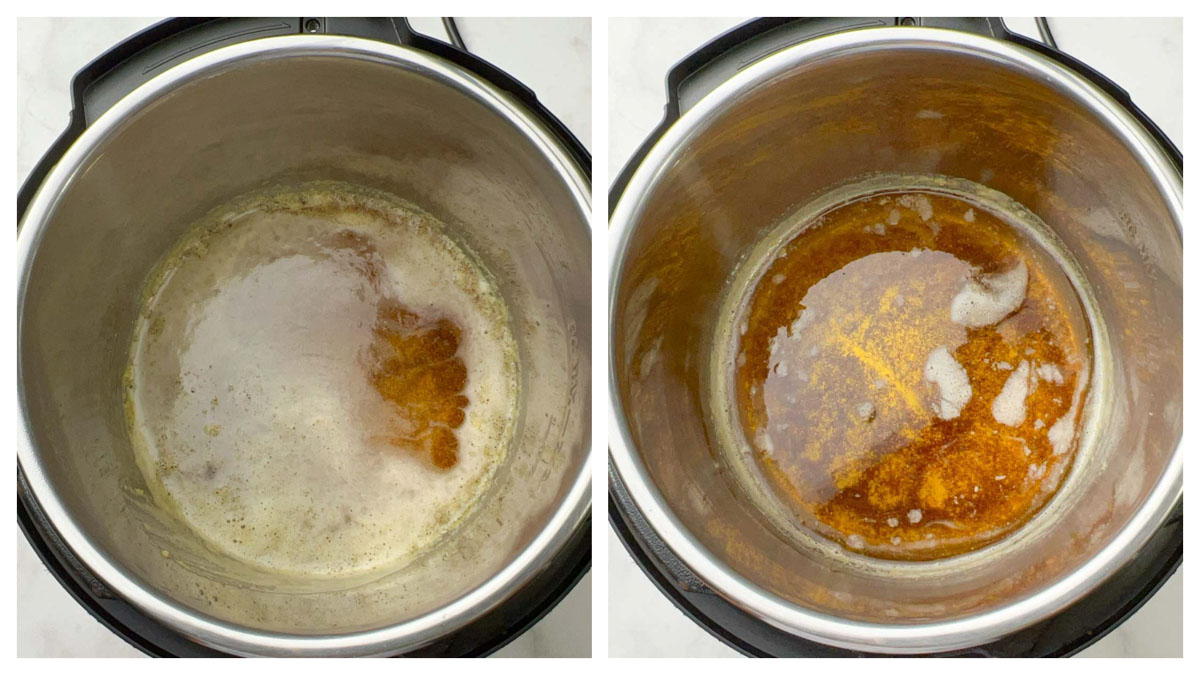
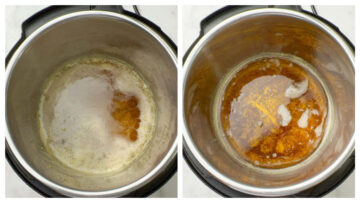
Step 3: Let the Milk Solids Caramelize.
Turn off the IP. The ghee will continue to cook, and the milk solids will begin caramelizing. It should be medium golden brown, not too dark. Keep a close eye on the ghee, to make sure that it doesn't burn.
At this stage, remove the steel insert from the pot to prevent it from further cooking. The ghee should be fragrant, with a rich and nutty aroma.
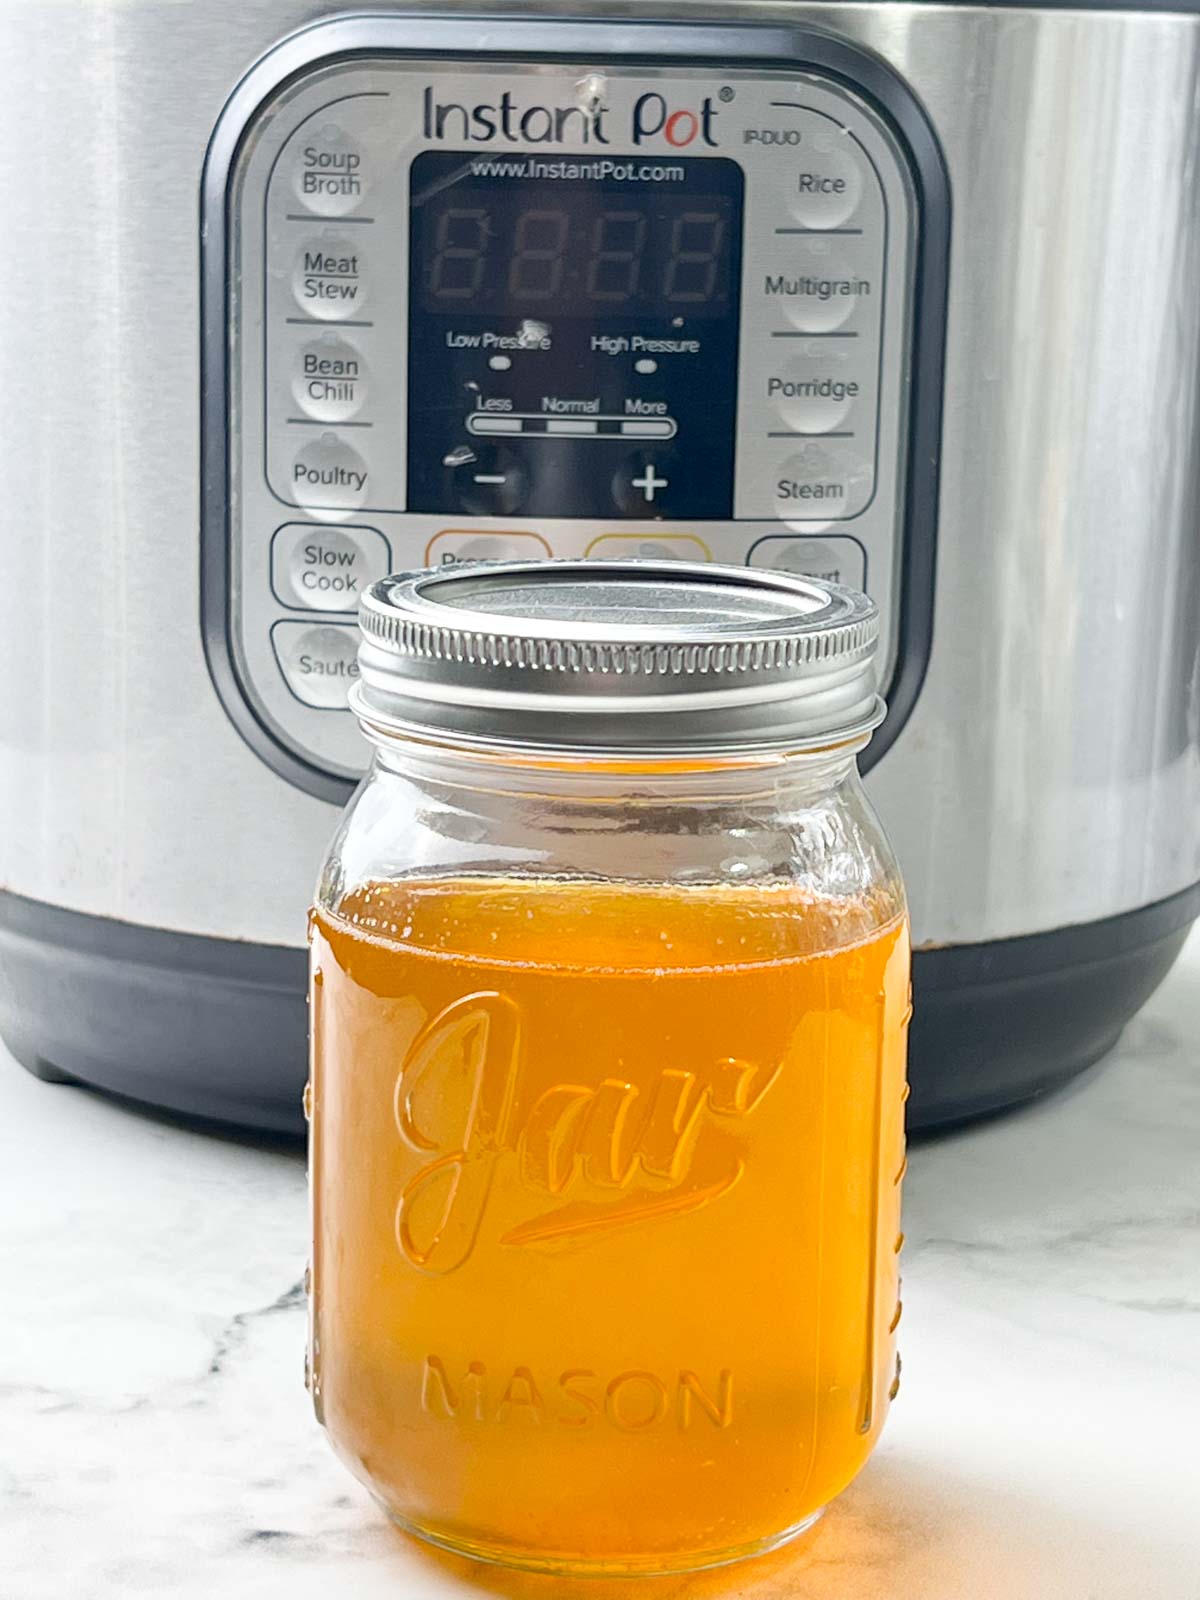
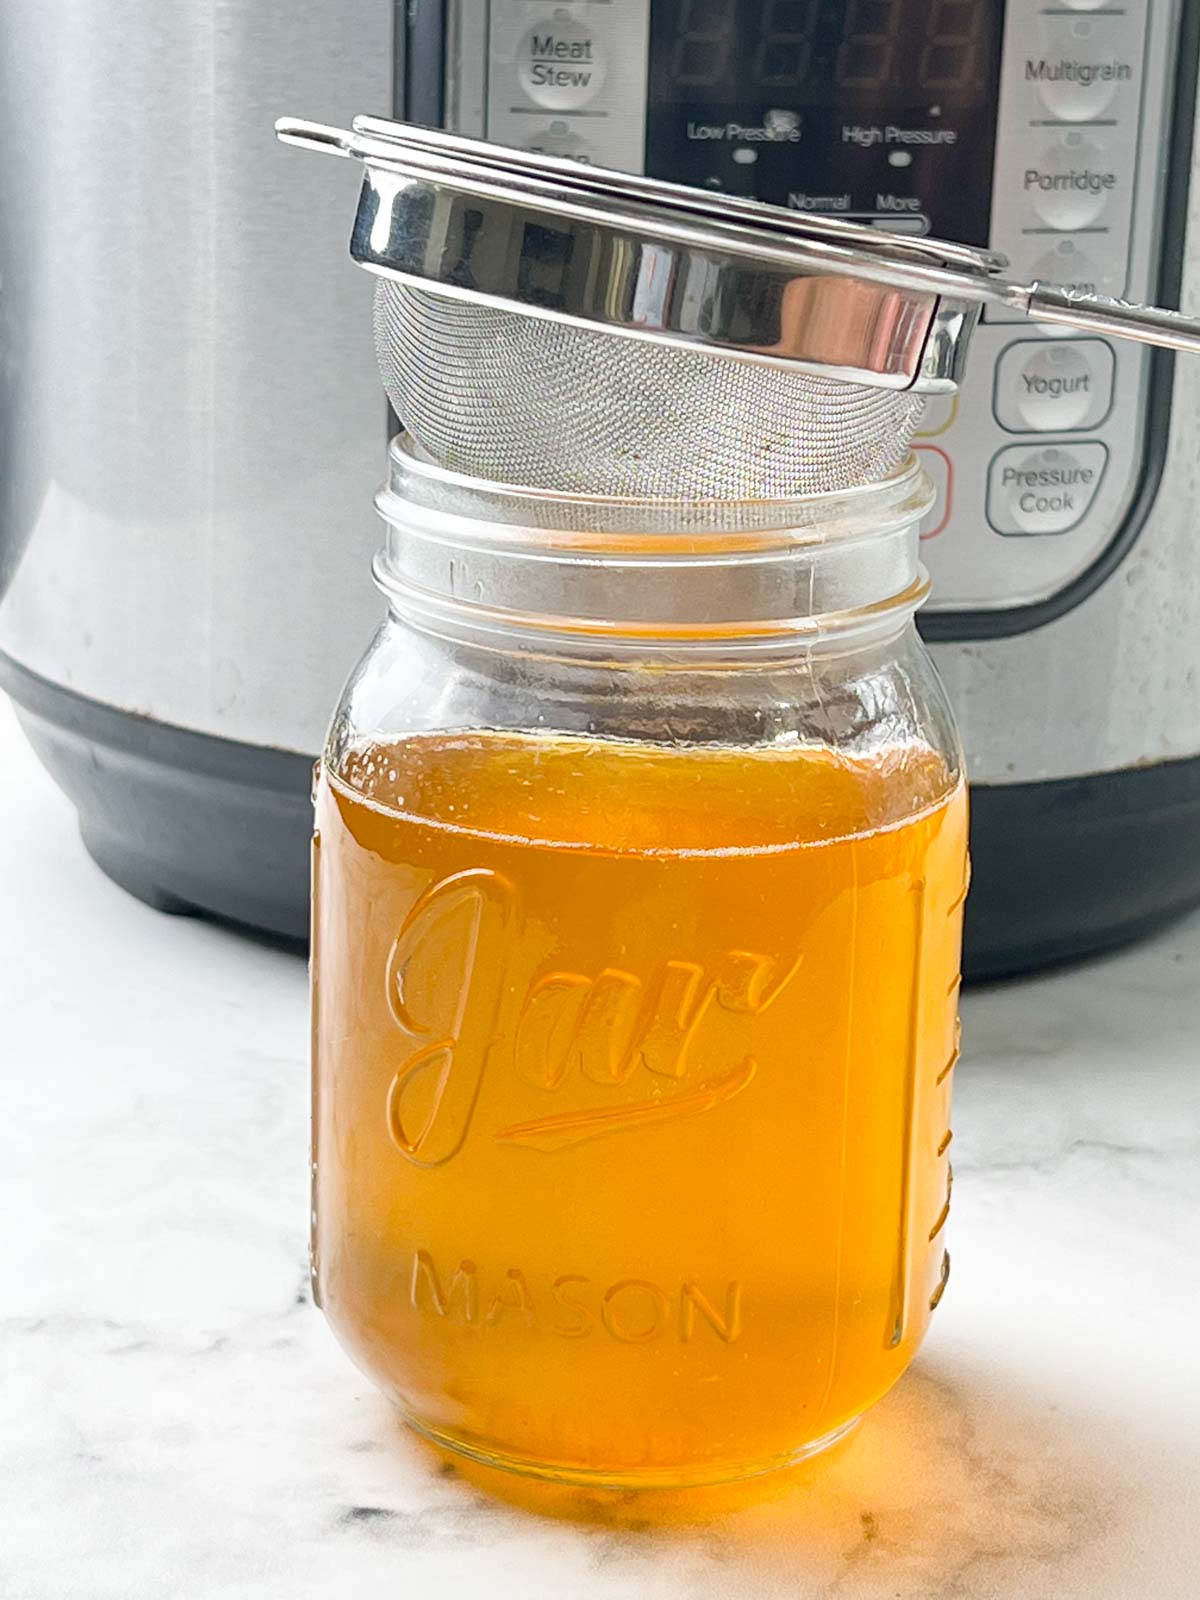
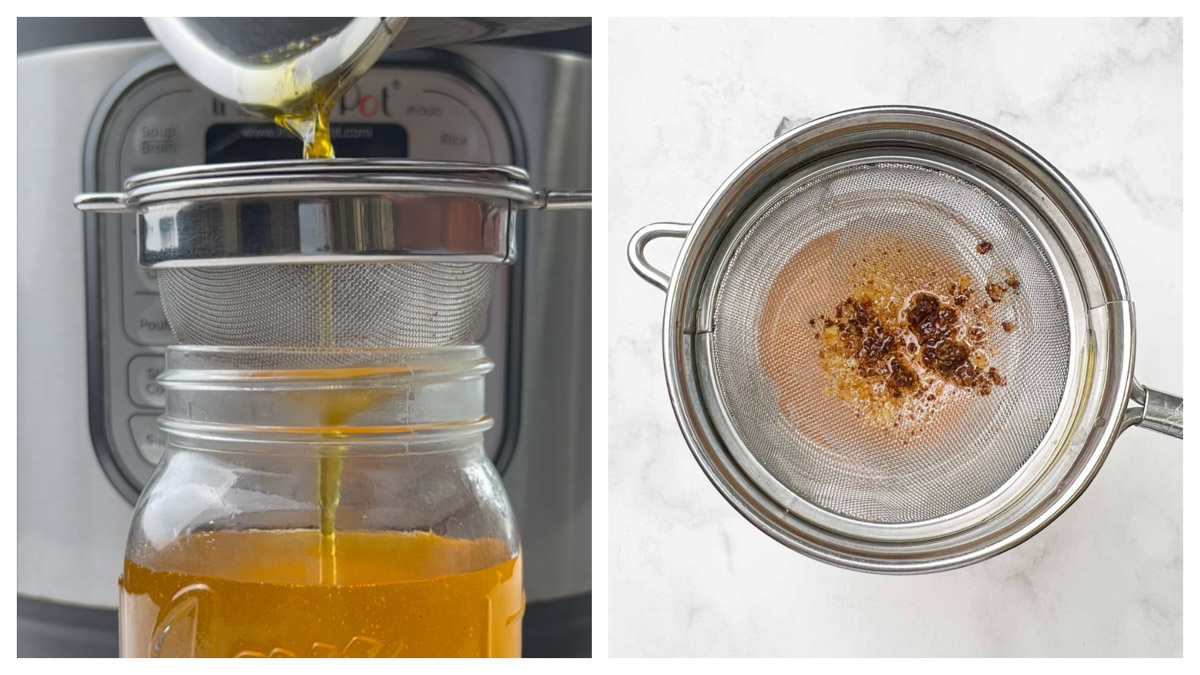
Step 4: Strain and Store.
While the ghee is still hot, Strain the golden ghee using a fine mesh sieve or cheesecloth into a clean, dry glass or steel storage jar. Let the ghee cool completely before closing the lid.
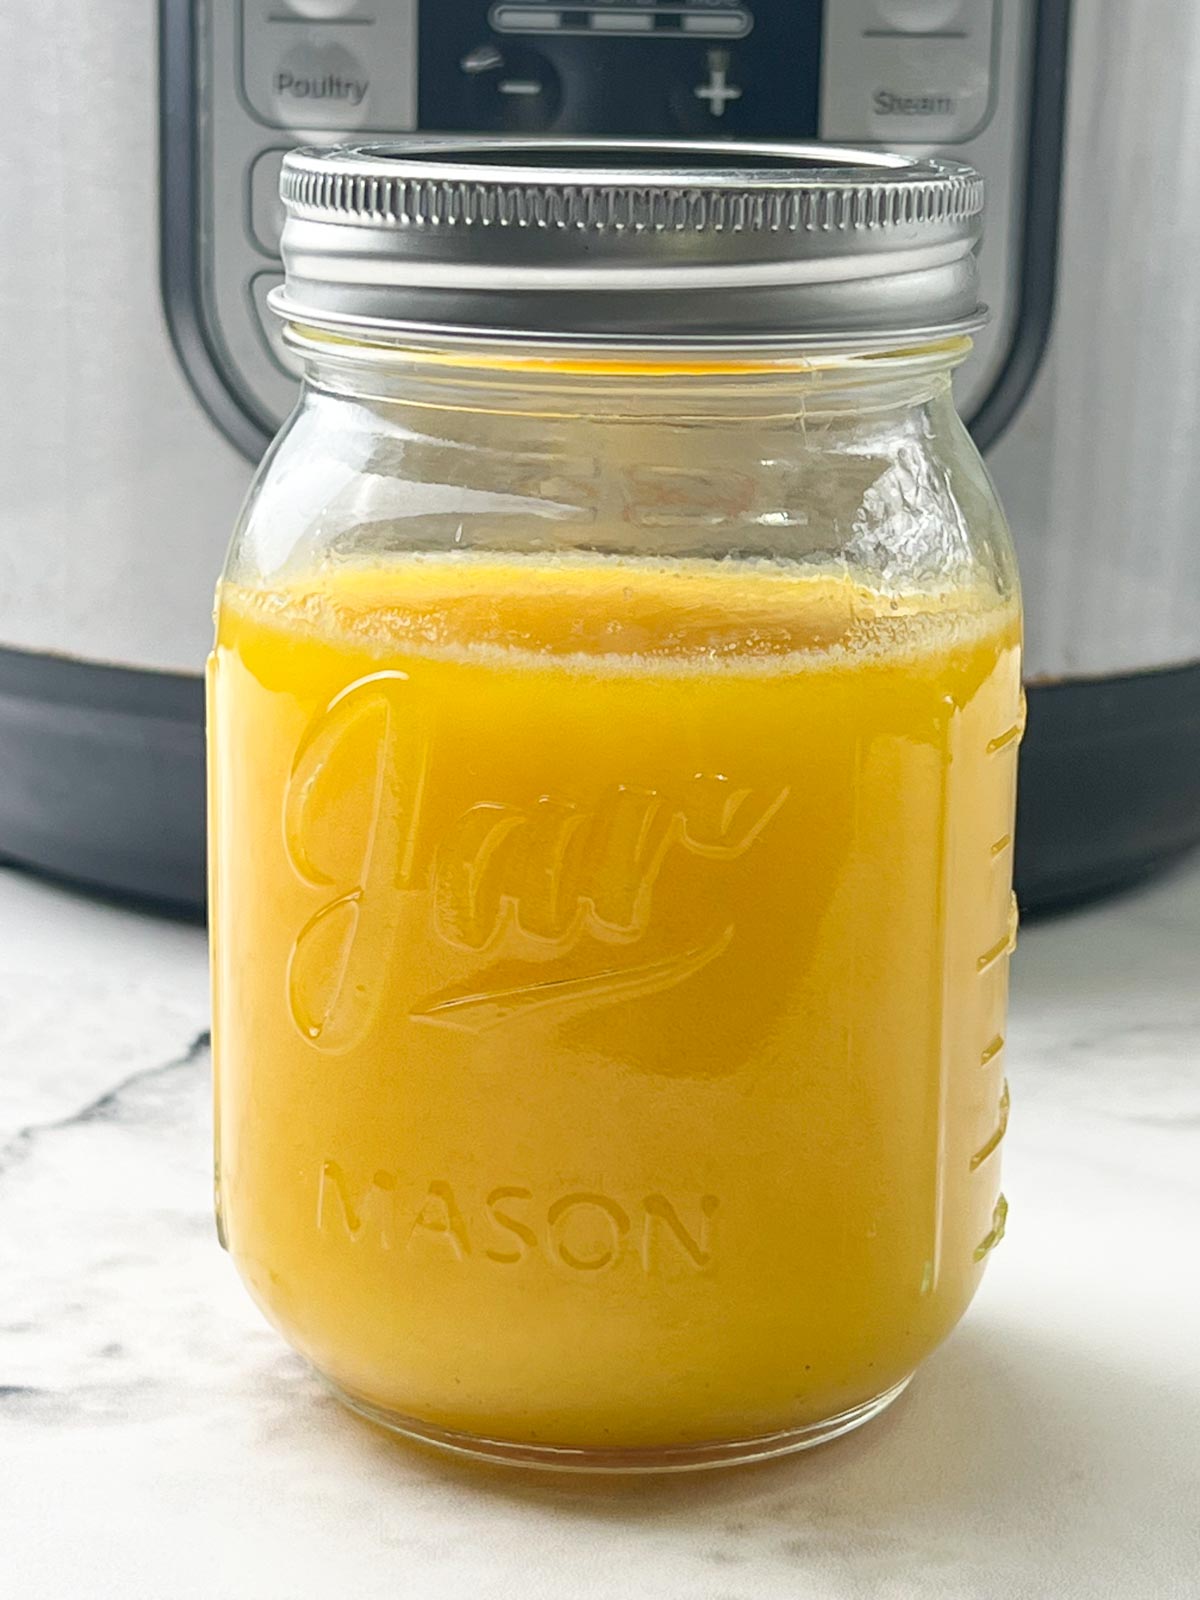
The Ghee is in a liquid state and golden in color when it's hot. It sets to a semisolid state, grainy texture, and turns to a bright yellow color as it cools to room temperature.
1 pound (16 ounces) of butter = Yields approximately 1 ½ cups of ghee.
To Make Ghee on a Stovetop Pot
- Unwrap the refrigerated unsalted butter. Place the butter into a clean, dry, deep, and heavy-bottomed pot. Melt the butter over medium-low heat. Keep stirring intermittently. Do not cover.
- After a few minutes, the melted butter will start to froth up, and bubble. It will sputter a bit as the water starts to evaporate.
- After a couple of minutes, the white foam will begin to clear, and tiny clear bubbles will fill the surface. The ghee color will gradually change from buttery pale yellow to light golden. The milk solids (milk protein) will begin to separate and sink to the bottom.
- Reduce the heat to low and continue cooking until the milk solids caramelize to a medium-golden brown. Be careful not to let them get too dark. Keep a close eye on the ghee to prevent burning.
- At this point, turn off the heat. The ghee should have a rich, nutty aroma and a golden hue.
- While the ghee is still hot, strain it through a fine mesh sieve or cheesecloth into a clean, dry glass or steel storage jar. Allow the ghee to cool completely before sealing the lid.
How to Use Ghee
- Smear it on top of hot fresh rotis, naan, chapati, or dosa.
- Roast paratha in ghee instead of oil.
- Use it in Indian desserts like besan ladoo, rice kheer, sweet pongal, badam halwa, and many more.
- Use it on masala bread toast, pancakes, or scones.
- Use ghee for making stir fries, curries, gujarati kadhi, and tempering for dal (lentils).
- Use for making rice dishes like khichdi, ghee rice, vegetable biryani.
- Because of its higher smoking point, you can also use it to deep fry, bake, or roast veggies.
Storage Suggestion
Ghee is shelf-stable, can be stored at room temperature for 3-4 months, and lasts up to 1 year when refrigerated.
Expert Tips
- Butter - Use organic, good-grade unsalted butter to make ghee. I highly recommend Kerrygold butter.
- Cooking Pot - Use tall stainless steel or a heavy bottom pot to make ghee. It prevents the ghee from spurting when it froths and bubbles.
- Cooking Time - The cooking time will depend on the type of butter, quantity, quality, and temperature of the butter.
- Color - The color of the ghee may vary depending on the cooking time and also on the quality of the butter used.
- Storage Jars - Use clean, dry, mason jars or stainless jars to store ghee. I do not recommend using plastic jars to store ghee.
- Double the recipe - Feel free to double or triple, If you increase the amount of butter, cooking time will also increase.
- Flavoring Ghee - To enhance the flavor of ghee, you can add smashed garlic cloves or curry leaves while cooking.
Frequently Asked Questions
Ghee is a healthy fat and rich in fat-soluble vitamins A, D, E, and K, antioxidants, and omega-3 fatty acids.
You can store ghee at room temperature in an airtight container in a cool place, so refrigeration is unnecessary. However, to extend its shelf life, you can store the ghee in the fridge for up to 1 year.
Traditionally, ghee is made from cow's milk. So, it is not vegan.
You can use them while making sweets like laddu, spread them on toast, add them to the flour while kneading dough to make roti or paratha, while baking with cookies, or add some sugar, and enjoy it as a sweet.
The ghee will turn dark brown, and it will taste bad.
More Instant Pot 101 Recipes

Homemade Ghee - Instant Pot & Stovetop
Ingredients
- 16 ounces unsalted butter grass fed
Instructions
Instant Pot Instructions
- Below are the steps for making ghee in Instant Pot using 1 Pound (16 ounces) of unsalted butter. Cooking time can vary depending on the type, quality, and temperature of the butter.
- Step 1: Melt the Butter. Unwrap the refrigerated unsalted butter. Place the butter into the instant pot steel insert and turn on the Saute (Normal) mode. Butter will start to melt.

- Step 2: Simmer Until Milk Solids Separate. After a few minutes, the melted butter will form a white foam, float on top, and bubble. It will sputter a bit, as the water starts to evaporate.After a couple of minutes, the white foam will begin to clear, and the surface will be filled with tiny clear bubbles. The ghee color will gradually change from buttery pale yellow to light golden. The milk solids (milk protein) will begin to separate and sink to the bottom.
- Step 3: Let the Milk Solids Caramelize. Turn off the IP. The ghee will continue to cook, and the milk solids will begin to caramelize. It should be medium golden brown, not too dark. Keep a close eye on the ghee, to make sure that it doesn't burnAt this stage, remove the steel insert from the pot to prevent it from further cooking. The ghee should be fragrant, with a rich, and nutty aroma.
- Step 4: Strain and Store. While the ghee is still hot, Strain the ghee using a fine mesh sieve or cheesecloth, into clean, and dry glass or steel storage jars. Let the ghee cool completely before closing the lid.
- The Ghee is in a liquid state and golden in color when it's hot. It sets to a semisolid state, grainy texture, and turns to a bright yellow color as it cools to room temperature.


To Make Ghee on Stovetop Pot
- Unwrap the refrigerated unsalted butter. Place the butter into a clean, dry, deep, and heavy-bottomed pot. Melt the butter over medium-low heat. Keep stirring intermittently. Do not cover.
- After a few minutes, the melted butter will start to froth up, and bubble. It will sputter a bit, as the water starts to evaporate.
- After a couple of minutes, the white foam will begin to clear, and the surface will be filled with tiny clear bubbles. The ghee color will gradually change from buttery pale yellow to light golden. The milk solids (milk protein) will begin to separate and sink to the bottom.
- Reduce the heat to low and continue cooking until the milk solids caramelize to a medium-golden brown. Be careful not to let them get too dark. Keep a close eye on the ghee to prevent burning.
- At this point, turn off the heat. The ghee should have a rich, nutty aroma and a golden hue.
- While the ghee is still hot, strain it through a fine mesh sieve or cheesecloth into a clean, dry glass or steel storage jar. Allow the ghee to cool completely before sealing the lid.
Notes
Tips to make the Best Homemade Ghee
- Butter - Use organic, good-grade unsalted butter to make ghee. I highly recommend Kerrygold butter.
- Cooking Pot - Use tall stainless steel or a heavy bottom pot to make ghee. It prevents the ghee from spurting when it froths and bubbles.
- Cooking Time - The cooking time will depend on the type of butter, quantity, quality, and temperature of the butter.
- Color - The color of the ghee may vary depending on the cooking time and also on the quality of the butter used.
- Storage Jars - Use clean, dry, mason jars or stainless jars to store ghee. I do not recommend using plastic jars to store ghee.
- Double the recipe - Feel free to double or triple, If you increase the amount of butter, cooking time will also increase.
- Flavoring Ghee - You can add some smashed garlic cloves or curry leaves while cooking ghee to enhance the flavor of the ghee.
Nutrition
★ Like this recipe? FOLLOW ME on Facebook, Instagram, Pinterest, and Youtube for more quick & easy recipes.

Leave a Reply